Custom Model Profiles#
A profile describes how a custom model runs when it is deployed for inference: the container image and version, the accelerator type, product, and count, the model precision, the performance metric to optimize for, and any engine arguments or environment variables.
Every custom model has at least one profile. When you bring a model into AMD AI Workbench from Hugging Face, an S3 bucket, or your own model registry, the settings you accept during onboarding become the model’s Default profile. You can then add your own named profiles alongside it — for example, a two-accelerator profile tuned for throughput next to a single-accelerator profile tuned for latency — and choose which one to use each time you deploy the model.
This page explains how profiles work, walks through creating a profile and deploying with it end to end, describes what each profile parameter does, and covers editing and deleting profiles.
How profiles work#
The Default profile#
The Default profile is created for you during onboarding, from the settings you confirm in the Runtime profile step of the Add new model wizard. If you leave those fields at their suggested values, the engine’s own defaults are preserved.
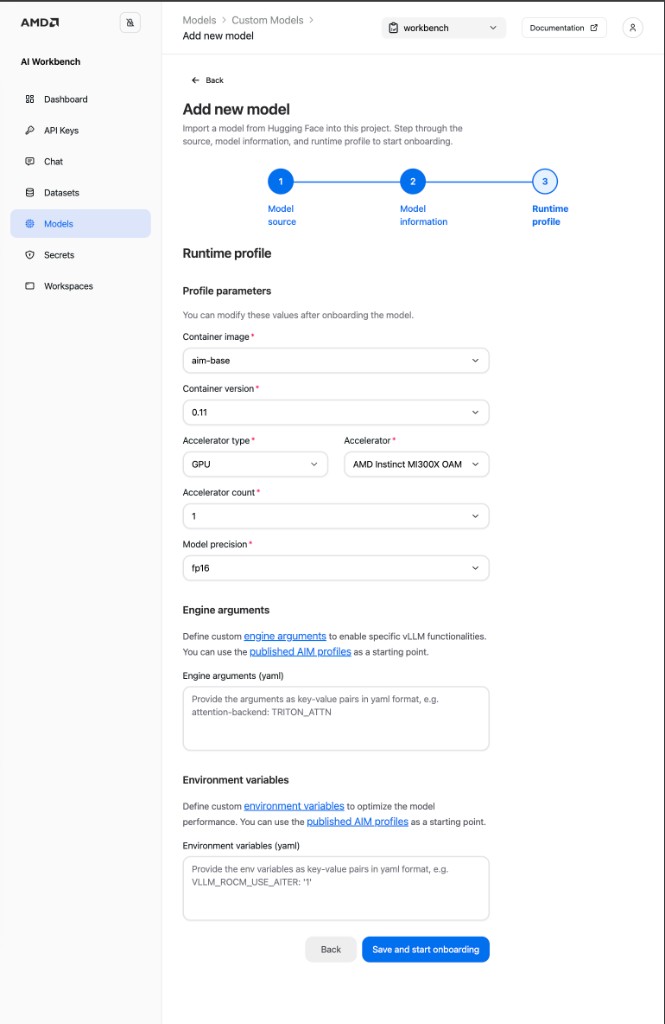
The Default profile is the model’s baseline, and it behaves differently from the profiles you add:
It is always listed first, and it is named Default — that name is reserved and cannot be reused.
You edit it through Model settings rather than the profiles screen, because it is part of the model’s own configuration. See Where to edit the Default profile.
It cannot be deleted. A custom model always keeps its baseline configuration.
It is the profile a deployment uses when you don’t choose a different one.
Named profiles#
Named profiles are the alternatives you create. Each one is independent: it carries its own complete set of parameters and can be edited or deleted without affecting the Default profile or any other profile on the model.
Named profiles exist so that a single onboarded model can be served in more than one way. Because the model’s weights are imported once, adding a profile costs nothing until you deploy with it — you are describing a possible configuration, not reserving hardware.
How a profile relates to a deployment#
Choosing a profile happens at deploy time, and the choice is pinned for the life of that deployment:
A deployment runs the profile it was created with. Editing that profile afterwards does not change the running deployment.
Different deployments of the same model can run different profiles at the same time.
While a deployment is using a named profile, that profile is locked — it cannot be edited or deleted until the deployment is removed. The Default profile is edited through Model settings instead (see Where to edit the Default profile) and stays editable while in use.
Autoscaling is not part of a profile. It is a per-deployment setting chosen in the deployment drawer. See Advanced Deployment Options.
Which combinations are available#
The accelerator, accelerator count, precision, and performance metric are not independent choices. The container image you select supports a specific set of combinations, and the profile form only offers values that lead to a valid one. As you change a selection, the remaining options narrow to match.
This is why a value that appears for one container image may be missing for another. If the form reports that an image supports no combination that can be saved, choose a different container image.
Open the profiles screen#
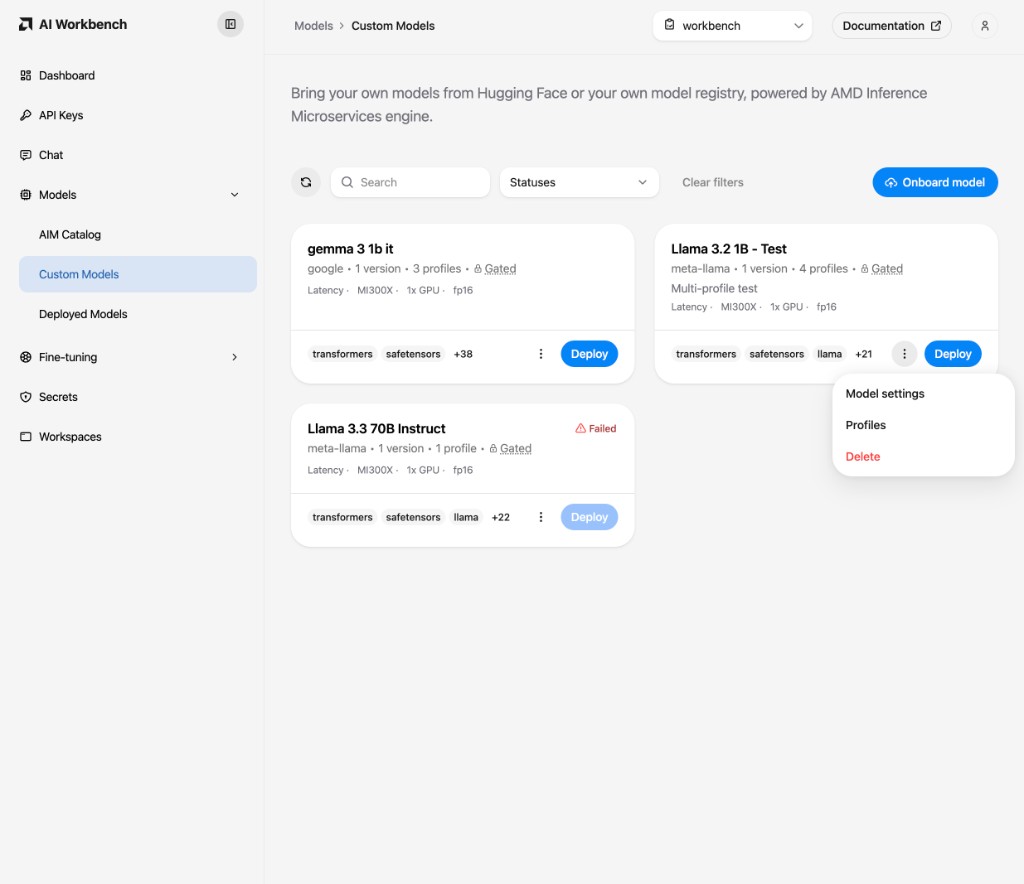
Go to the Models page and open the Custom Models tab.
Find the model you want to work with. Its card shows how many profiles it has, for example 4 profiles.
Open the card’s action menu (the three dots) and select Profiles.
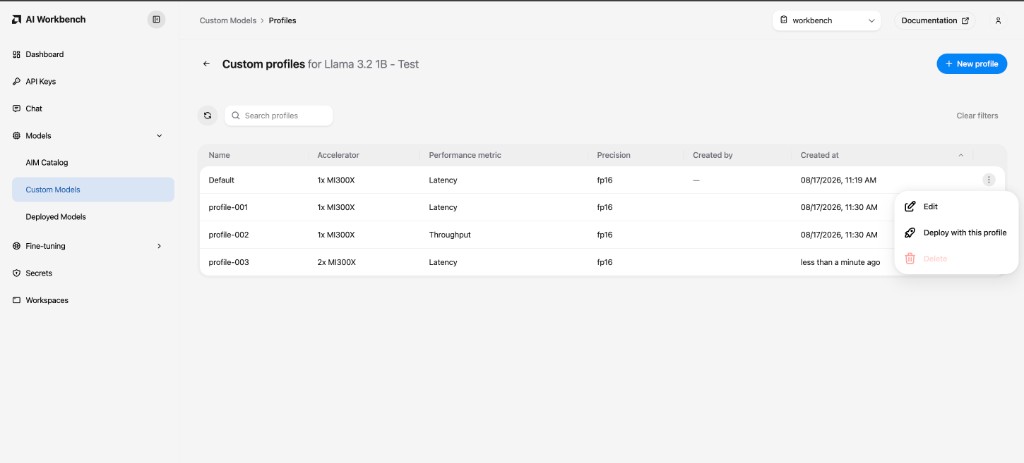
The Custom profiles screen lists every profile on the model, with the Default profile first:
Name — the profile’s display name.
Accelerator — the accelerator product and how many are allocated, for example
2x MI300X.Performance metric — whether the profile is tuned for latency or throughput.
Precision — the numerical precision the model runs at.
Created by — who added the profile. The Default profile has no author because it comes from onboarding.
Created at — when the profile was added.
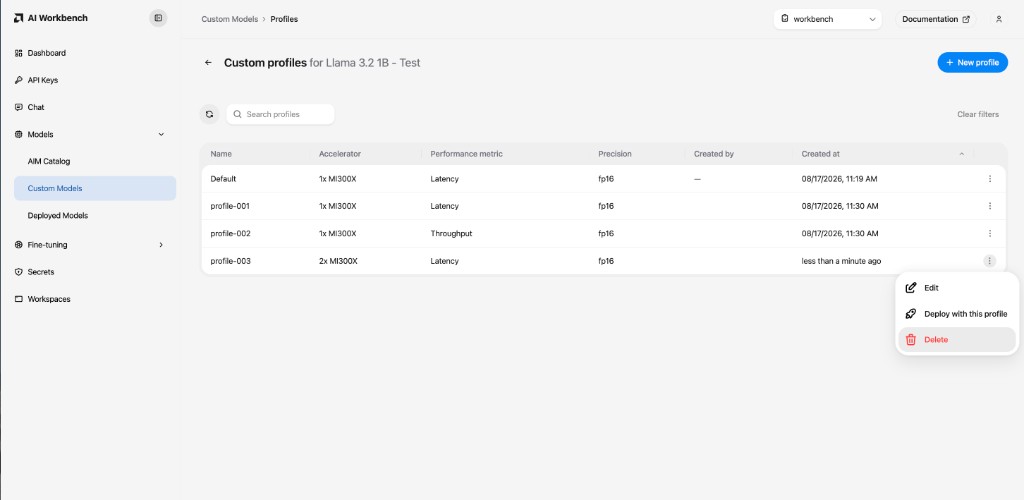
Use the search field to filter the list by name, accelerator, performance metric, precision, or creator, and the arrow at the top left to return to the Custom Models tab. Each row’s action menu offers Edit, Deploy with this profile, and Delete.
Create a profile#
On the Custom profiles screen, select New profile. This opens the Add new profile drawer.
Enter a Profile name. The name must be unique among the model’s profiles and cannot be
Default. Choose something that says what the profile is for, such asthroughput-2xorlow-latency-fp8.Review the runtime parameters. A new profile starts from the model’s Default hardware selection, so you only need to change what you want to differ. Each parameter is described under Profile parameters.
Optionally add Engine arguments and Environment variables. These start empty rather than inheriting the Default profile’s, so a new profile never silently carries overrides you didn’t ask for. See Engine arguments and environment variables.
Save the profile:
Save adds the profile and returns you to the list.
Save and deploy adds the profile and opens the deployment drawer with it already selected.
A newly created profile takes a moment to become available. Until it is ready, it is marked Not ready in the deployment drawer and cannot be deployed yet.
Note
You can also create a profile without leaving a deployment. The Profile dropdown in the deployment drawer has an Add new profile action at the bottom that opens the same form, and the profile you create is selected for that deployment when you save it.
Deploy with a profile#
There are two ways to start a deployment with a specific profile:
From the Custom profiles screen, open a profile’s action menu and select Deploy with this profile.
From the model’s card on the Custom Models tab, select Deploy and then choose the profile in the drawer.
Either way, the Custom model deployment drawer opens with a Profile dropdown. The dropdown lists every profile on the model, preselecting the one you started from, or the Default profile if you started from the card. Selecting a profile shows a read-only Profile information panel summarizing what it will run with: metric, precision, accelerator, accelerator count, and any engine arguments and environment variables.
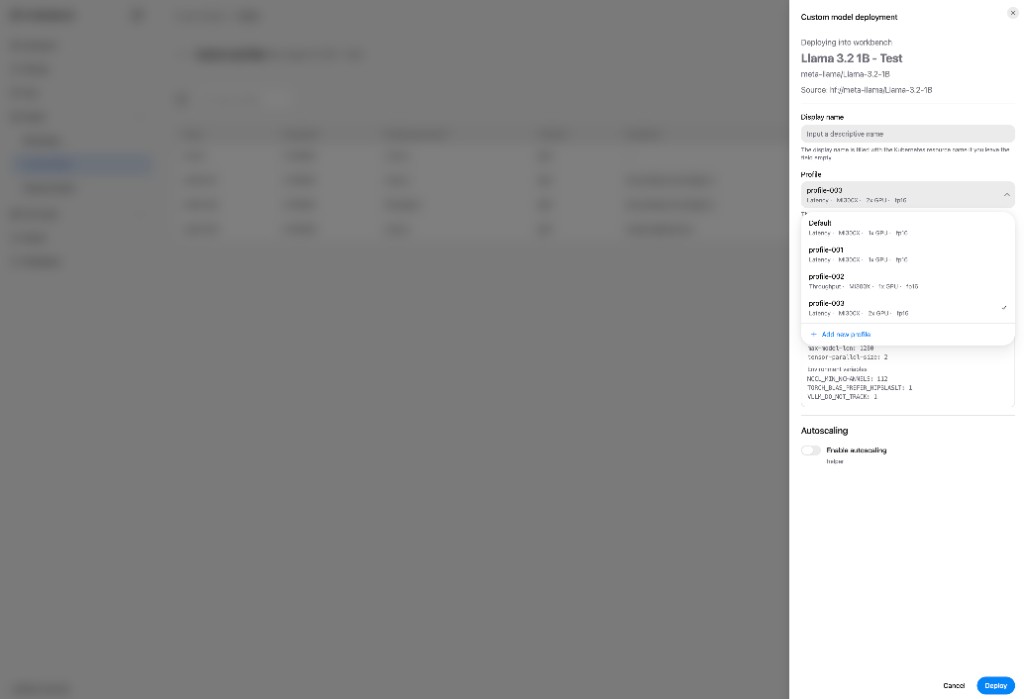
Fill in the rest of the deployment options — an optional Display name, and Autoscaling if you want the deployment to adjust its replica count with demand — then select Deploy.
Important
A profile must have finished reconciling before it can be deployed. Profiles that are not ready yet are marked Not ready and cannot be selected. If you just created a profile, wait a moment and try again.
Follow the deployment and use it#
Deploying is not instant. The platform schedules the workload, pulls the container image, and loads the model weights before the model can serve requests.
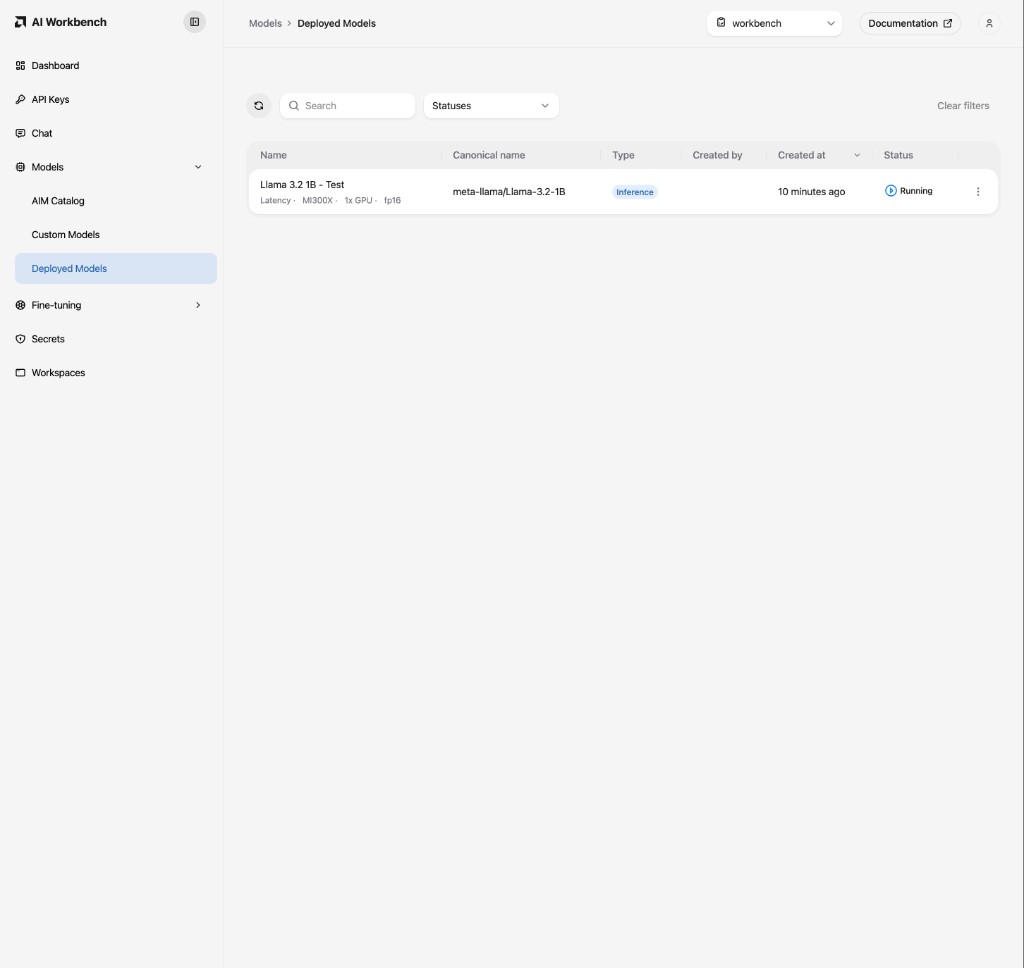
Go to the Models page and open the Deployed Models tab. Your deployment moves from Pending to Running. Its subtitle shows the hardware of the profile it is running — metric, accelerator, accelerator count, and precision — so two deployments of the same model are distinguishable at a glance.
- alt:
The Deployed Models tab listing a running custom model deployment with its profile’s metric, accelerator, and precision.
2. To confirm exactly what the deployment is running, open its action menu and select **Open details**. The workload detail page has a **Profile** card showing the performance metric, accelerator, accelerator count, and precision in effect, alongside the deployment's [inference metrics](metrics.md) and connection details.

3. Once the deployment is **Running**, open the **Chat** page and select it from the model dropdown. The dropdown lists running deployments that support chat. Each entry is labelled with the **Display name** you gave the deployment, or the model's name if you left it blank, and shows the name of the profile it runs underneath — so you can tell two deployments of the same model apart and pick the one you want to try.

   ```{image} ../../core-img/inference/custom-model-profiles-chat.png
:alt: The Chat page model dropdown showing a custom model deployment labelled with the name of the profile it runs.
For everything else you can do with a running deployment — connecting from your own applications, monitoring, and undeploying — see Deploy a Custom Model.
Edit a profile#
On the Custom profiles screen, open a profile’s action menu and select Edit. The Edit profile drawer opens with the profile’s current values filled in. Change what you need and select Save.
Renaming a profile changes only the label you see; its configuration is untouched.
Note
Editing a profile updates it for future deployments. Deployments that are already running are not changed retroactively. To apply a new configuration to a running deployment, undeploy it and deploy again with the updated profile.
When editing is blocked#
A named profile that a deployment is using cannot be edited — not even to rename it. Its Edit action is disabled on the list, and the drawer warns you and names the deployments holding it. Undeploy those deployments first, then edit the profile. This applies to named profiles only; the Default profile is edited separately through Model settings (see below).
Where to edit the Default profile#
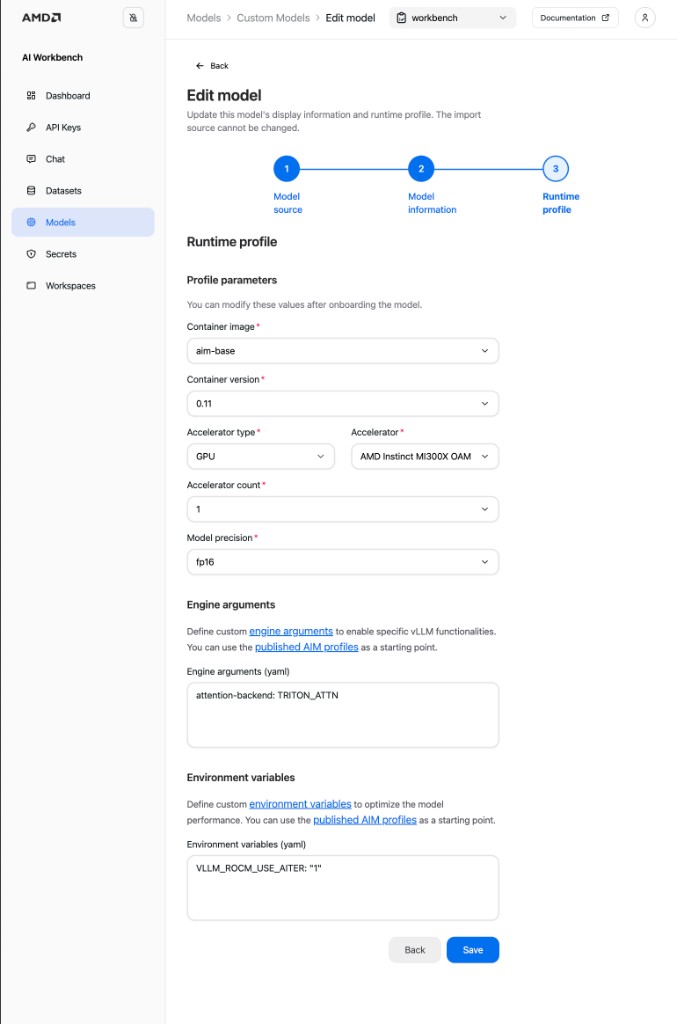
The Default profile is the model’s own configuration rather than a separate profile, so selecting Edit on it takes you to the model’s Edit model flow instead of the profile drawer. Step through to Runtime profile, update the baseline settings, and select Save. The import source cannot be changed, but the display information and the runtime profile can. Because it is edited this way, the Default profile can be updated even while a deployment is using it — the one exception is an edit that would drop hardware another deployment still relies on, which is rejected.
Delete a profile#
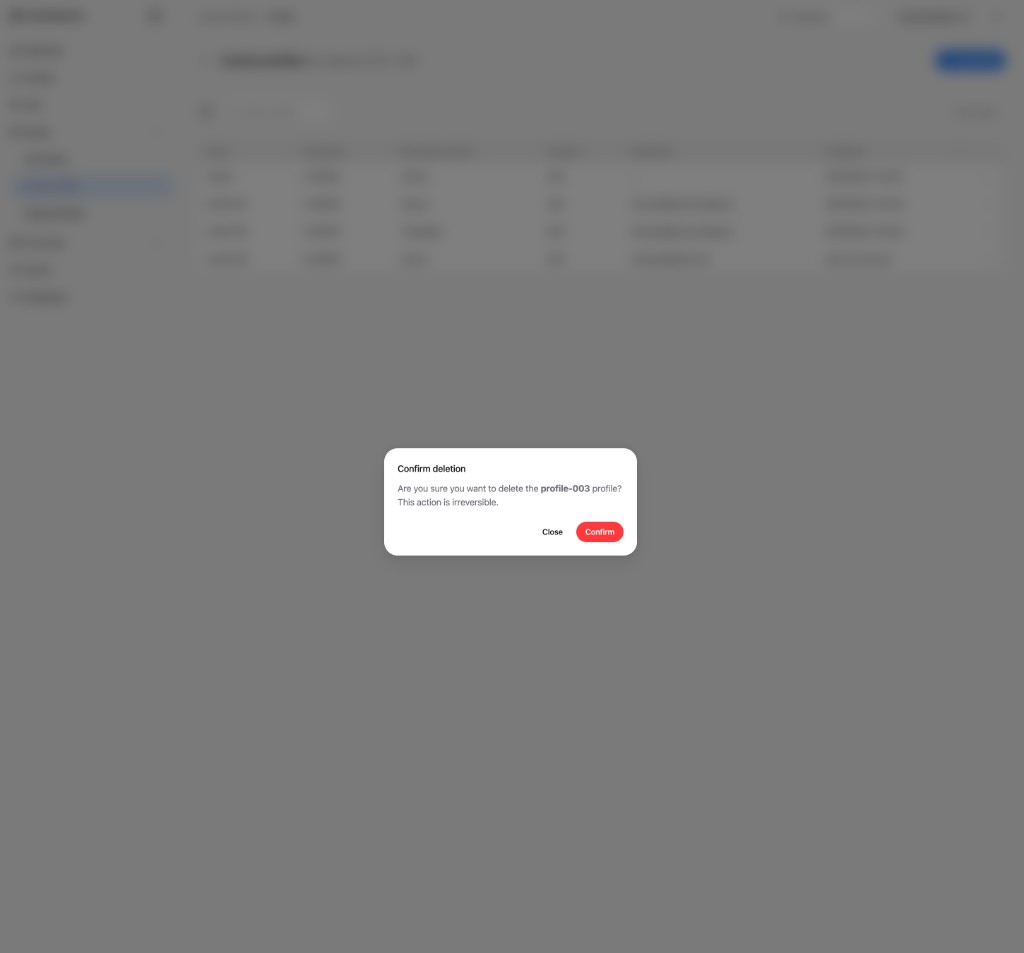
On the Custom profiles screen, open a profile’s action menu and select Delete, then select Confirm in the confirmation dialog. Deleting a profile is irreversible — there is no undo and no version history to restore from. The model itself, its weights, and its other profiles are unaffected.
Two profiles cannot be deleted:
The Default profile. Its Delete action is always disabled, because a custom model always keeps its baseline configuration.
A profile a deployment is using. Undeploy the deployments that reference it first; the Workbench names them if the deletion is refused.
Profile parameters#
The defaults ship from the AMD Inference Microservices engine and reflect a configuration that has been validated for the model and the available hardware. Start with them, and change a parameter only when you have a concrete reason — pinning hardware on a partitioned cluster, serving a larger model that needs more than one accelerator, matching a precision your model requires, or trading latency against throughput.
Container image#
The base container image family used to run the model, such as aim-base (and EPYC- or Radeon-specific families where applicable). The image determines the inference runtime and the hardware it targets, as well as which parameter combinations are available. Leave this at the default unless you have a specific reason to run a different image family.
Container version#
The version (tag) of the selected container image, for example 0.11. Newer versions may include performance improvements or fixes. Pinning a specific version keeps a deployment reproducible.
Accelerator type and Accelerator#
Accelerator type selects the broad class of hardware (for example, GPU). Accelerator selects the specific product within that class (for example, AMD Instinct MI300X). Only hardware available in your cluster is offered. Pinning the accelerator is the key setting for partitioned-cluster use cases.
Accelerator count#
The number of accelerators allocated to a single model replica. Larger models may require more than one accelerator to load and serve. Setting this higher than necessary reserves hardware that other workloads could use; setting it too low can prevent the model from starting.
Model precision#
The numerical precision used to run the model, for example fp16. Precision affects memory footprint, throughput, and output quality. Use the precision recommended for your model unless you are deliberately trading accuracy for performance or memory.
Performance metric#
What the profile optimizes for: Latency, for the fastest response to an individual request, or Throughput, for the most total work across concurrent requests. Which metrics are offered depends on the rest of the parameter selection, because the container image only supports certain combinations.
Engine arguments and environment variables#
A profile can also pass advanced configuration directly to the inference engine. Both are entered as key-value pairs in YAML format, one per line.
Engine arguments enable specific inference engine functionality. For example:
max-model-len: 32768
gpu-memory-utilization: 0.9
Environment variables tune model performance through the runtime environment. For example:
VLLM_ROCM_USE_AITER: "1"
Leave either field empty to use the engine defaults. Each field links to the relevant vLLM reference documentation (engine arguments and environment variables). You can also use a published AIM profile as a starting point.
Warning
Engine arguments and environment variables are advanced options. Invalid keys, unsupported values, or combinations that don’t match your model or hardware can prevent a deployment from starting or degrade its performance. Change them deliberately, one at a time, and validate the result before relying on the deployment.
Rules and limits#
Profile names are unique per model, ignoring case. Two models can each have a profile called
throughput, but one model cannot have two.Defaultis reserved for the model’s onboarding profile and cannot be used for a profile you create.The Default profile cannot be deleted, and is edited through Model settings rather than the profiles screen.
Named profiles in use are locked. A named profile a deployment references cannot be edited or deleted until that deployment is removed. The Default profile stays editable through Model settings even while in use, though edits that would drop hardware another deployment still relies on are rejected.
A profile must be ready before it can be deployed. A profile that has just been created is briefly unavailable.
Edits are not retroactive. Changing a profile affects future deployments only; running deployments keep the configuration they started with.
There is no version history. Deleting a profile is irreversible, and reverting an edit means entering the previous values again.
Not every combination is validated. Custom engine arguments, environment variables, and image/precision/accelerator combinations are not all validated. If a configuration behaves unexpectedly — especially on new hardware — revert to the defaults and contact AMD support.
Validate before production. After creating or changing a profile, deploy and verify the model behaves as expected before depending on it for production traffic.